Backyard Privacy Ideas to Turn Your Yard Into a Personal Retreat
Woman Enjoying Coffee in a Secluded Backyard How to Make Your Backyard More Private Whether you're dreaming of stargazing in...
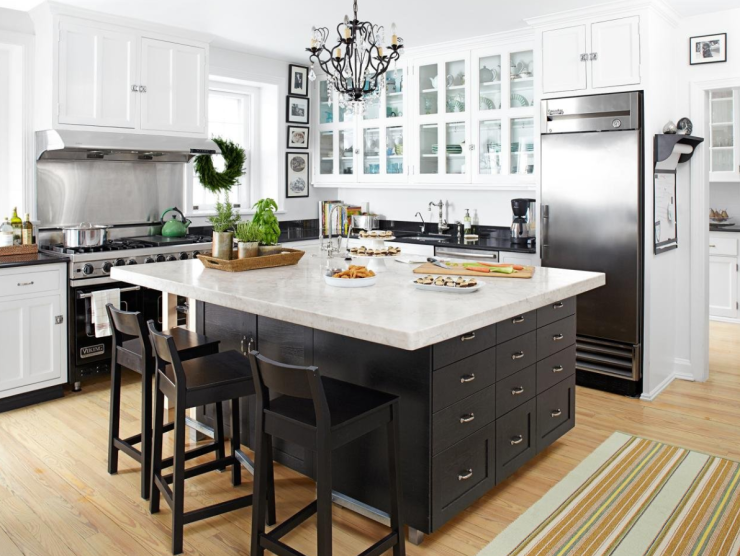
They say life’s better on an island — especially in your kitchen. A kitchen island adds storage, counter space, and extra seating, making it one of the most versatile upgrades you can make. But professionally built islands can run between $1,000 and $7,000. If you want something stylish, functional, and budget-friendly, why not build your own?
From mobile carts to stylish breakfast bars, DIY kitchen islands come in many forms. In this guide, we’ll walk you through two simple and popular builds:
• A base cabinet kitchen island
• An upcycled dresser island
Option 1: DIY Kitchen Island from Base Cabinets
Step 1: Gather Your Tools and Materials
Before you start, plan your layout and gather your supplies. Since this type of island is permanent, choose durable materials and make sure you’re comfortable with its placement.
Materials Checklist:
• Pre-assembled base cabinets
• Two 8-inch 2x4s
• Wood shims
• Power drill
• Cabinet screws (#8 x 2½")
• Short screws (#8 x 5/8")
• Clamps and level
• Stud finder
• Sander, primer, and paint
• 1½" steel angle brackets
• Decorative finishes (drawer pulls, beadboard, etc.)
Step 2: Choose the Right Spot
Since this design is fixed, be sure of the location before anchoring. Allow at least 42 to 48 inches of clearance around all sides for comfortable movement.
A great trick: cut out a cardboard stencil of your island to visualize the space.
If you’re installing over hardwood, use a stud finder to locate floor joists—you’ll need to anchor the island securely through the subfloor.
Step 3: Assemble the Cabinets
• Line up your cabinets and ensure they’re level. Use shims if needed.
• Clamp them together and drill 1/8" pilot holes beside each hinge.
• Use cabinet screws to secure the cabinets via their face frames.
• Don’t fasten through the cabinet sides—they're not designed to bear weight.
• Remove all doors and drawers before installation.
Step 4: Anchor the Island to the Floor
How to Secure It:
• Cut two 8-inch (or longer) 2x4 blocks for mounting.
• Mark your floor where the toe-kicks align, then attach your 2x4 blocks just inside those lines.
• Secure with long screws (or concrete anchors if on a slab).
• Place the island on top, so the blocks fit inside the toe-kicks.
• Screw through the cabinet toe-kicks into the blocks.
Step 5: Add Electrical Outlets (If Required)
If your island is fixed and your state follows National Electrical Code (NEC) guidelines, you’ll need to install at least one outlet.
⚠️ Safety Tip: Don’t DIY the electrical work unless you’re qualified—hire a licensed electrician.
Step 6: Add Finishing Touches
Here’s how to polish your project:
• Toe Kick Panels: Cover exposed supports with kickboards.
• Beadboard or Trim: Add texture to plain cabinet sides.
• Paint & Primer: Use satin latex paint for easy cleaning and stain resistance.
• Hardware: Install drawer pulls or knobs that match your kitchen style.
• Corbels or Brackets: Support extended countertops with decorative or steel supports.
• Countertop: Choose a surface based on function, budget, and style.
o Granite is durable but pricey.
o Butcher block is trending but needs regular maintenance.
Option 2: DIY Kitchen Island Using a Dresser
Step 1: Pick the Right Dresser
Old dressers make surprisingly great kitchen islands. Look for something:
• Deep and sturdy (for a permanent island)
• Smaller or lighter (for a movable cart)
• Ideally free or cheap—check Facebook Marketplace, Craigslist, or garage sales
Make sure the size allows for 42–48 inches of space around it once placed in your kitchen.
Materials Checklist:
• Sandpaper, primer, and paint
• Wood or plywood for shelves
• Drill/screwdriver
• Level and tape measure
• Casters (optional)
• Optional hardware (hooks, racks, etc.)
Step 2: Sand, Prime, and Paint
Prep your dresser by sanding off old paint and smoothing rough edges. Apply primer, then paint with a durable satin latex paint that resists kitchen messes.
Step 3: Add Shelving
Turn lower drawers into open shelves:
• Remove drawers and tracks
• Measure spaces and cut plywood boards to size
• Paint or line the shelves with waterproof material
• Insert your new open shelving
Step 4: Install the Countertop
Just like with the cabinet island, you’ll need to choose a suitable countertop. Butcher block, laminate, or even pre-cut wood can all work, depending on the look you’re after.
Expert Tip: Ensure your dresser can support the weight of the new countertop. Reinforce it if needed.
Step 5: Add Casters (Optional)
Want your island to be mobile?
• Stem-mount casters work well on dressers with solid legs
• Plate-mount casters are better for flat-bottom furniture
• Always use locking rubber casters to prevent slipping and floor damage
Step 6: Personalize With Add-Ons
Add functional and fun upgrades:
• Hooks for utensils or oven mitts
• Towel rack
• Paper towel holder
• Spice rack or shelves
• Tablet mount for digital recipes
• Power cord with floor cover for appliances
Whether you're repurposing furniture or building from cabinets, creating your own DIY kitchen island is a fun and practical way to enhance your kitchen without breaking the bank.
With a bit of creativity and a weekend’s worth of work, you can craft a custom centerpiece that fits your space, budget, and personal style.
They say life’s better on an island — especially in your kitchen. A kitchen island adds storage, counter space, and extra seating, making it one of the most versatile upgrades you can make. But professionally built islands can run between $1,000 and $7,000. If you want something stylish, functional, and budget-friendly, why not build your own?